
A room can look larger after one quiet edit. The doorway shifts toward a corner, a chair narrows, or the gap beside a bed expands by a few inches. None of these changes announce themselves as reconstruction. Together they describe a home with circulation space that does not exist.
An AI image tool can remove personal clutter or adjust recoverable window glare without inventing an exterior view, but a property image still has to respect the room’s fixed geometry. The useful question is not whether the edit looks natural. It is whether a visitor can walk the same route after arriving in person.
PicEditor AI offers background cleanup, object erasing, image expansion, relighting, and other focused routes. For listing work, each operation needs a boundary. Permanent fixtures, openings, floor area, ceiling height, and the scale of included furniture are not decorative material.
Sort Room Details By What They Communicate
Before using an AI Photo Editor, label every visible element as fixed, movable, or temporary. Walls, doors, windows, built-ins, radiators, and stairs are fixed. Chairs and lamps are movable, although their size still helps show scale. Laundry, cables, open packaging, and personal photographs may be temporary distractions.
Treat Openings As Part Of The Floor Plan
A doorway shows both location and width. Removing its frame, widening the visible gap, or changing the swing can alter how the space appears to function. Keep the full opening when it explains access to a bathroom, balcony, corridor, or storage area.
Use Familiar Objects As Scale Witnesses
A standard door, electrical outlet, tile, or piece of known furniture gives viewers a rough scale cue. Do not shrink a sofa to reveal more floor or stretch a desk to fill an expanded wall. If an object will not remain with the property, it can still reveal the room’s actual proportions.
| Element | Safe treatment | Misleading treatment |
| Personal photo | Blur or remove within its frame | Erase the entire wall feature |
| Laundry basket | Remove and repair visible floor | Extend floor beyond the wall |
| Window | Balance glare while keeping frame | Replace size or exterior orientation |
| Doorway | Clean marks around trim | Widen passage or change location |
These categories stop a privacy cleanup from becoming an architectural redesign. They also help an agent explain why an awkward but meaningful feature stayed in the final image.
Compare Cleanup Cropping And Virtual Restaging
Three approaches solve different problems. A tighter crop can exclude a temporary mess but may hide the route through the room. Object cleanup can remove a distracting item while preserving the view. Virtual restaging can demonstrate use, yet it introduces furniture and style that must be clearly presented as illustrative.
Use A Crop When The Route Stays Visible
Start with the crop because it changes the fewest pixels. Crop only if the door, major window, and primary walkway remain understandable. A vertical crop for mobile can work for a detail view, but it should not replace the wider frame that shows how the room connects.
Remove Temporary Clutter With A Fixed Mask
Draw the smallest possible area around the item. After the photo edit, overlay the result on the source at partial opacity. Floorboard lines, grout, baseboards, and shadows should continue without bending. Warped lines often reveal that the repaired area expanded beyond the object.
Label Every Furnished Concept As Illustrative
Virtual furniture can help viewers imagine a use, but it cannot demonstrate that a particular sofa fits. Keep the empty or currently furnished source in the listing set and identify staged versions. An AI Photo Editor image should not be the only evidence of a room’s dimensions.
PicEditor AI can support any of these approaches. The decision belongs to the listing purpose: document the current room, protect privacy, or illustrate one possible arrangement. Mixing those goals in a single unlabeled image creates the confusion.
Keep a small set rather than one heavily edited hero frame: the honest wide view, a privacy-cleaned version if needed, and any clearly labeled staging concept. That sequence lets viewers see the room first and the idea second. It also gives the agent a source to answer questions about what is actually present.
Trace The Walkway From Entrance To Window
Review the edited frame as a route. Start at the visible entrance, move past the largest furniture, and finish at the window or next doorway. Estimate the narrowest gap using a fixed object as reference. If the route becomes wider only in the edited version, inspect that area before approval.
Overlay Architectural Edges At Half Opacity
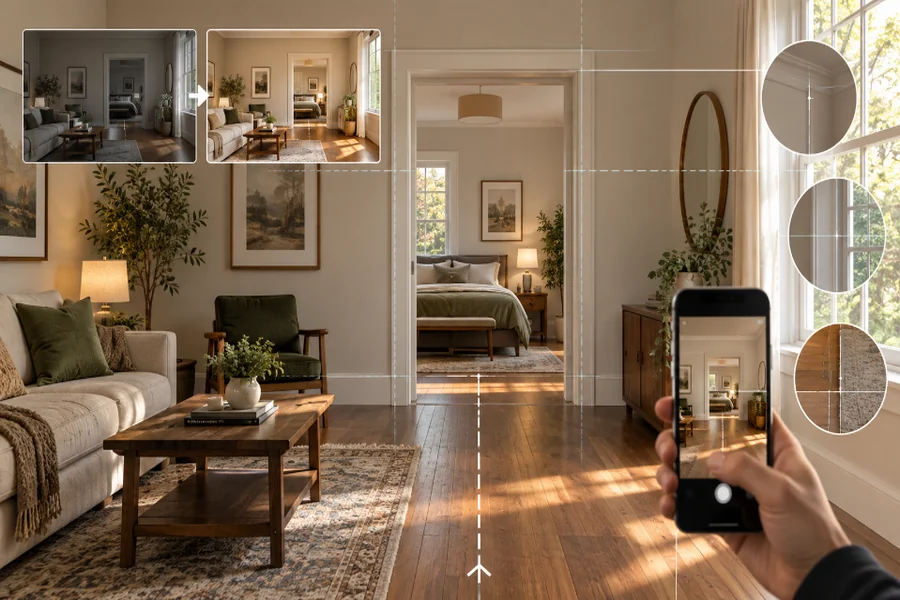
Align the source and candidate, then compare door jambs, wall corners, ceiling lines, floor seams, and window frames. Small exposure changes may alter their contrast, but the lines should occupy the same positions. A shifted corner is a geometry error even when the regenerated texture looks convincing.
Ask A Viewer To Describe The Layout
Show both images separately and ask where the doors lead, which furniture blocks movement, and how daylight enters. The descriptions should agree on the room’s structure. If the candidate suggests a second exit or an open path that the source does not show, return to the original mask.
Keep PicEditor AI enhancement modest until this test passes. Brightness and clean surfaces can make a listing easier to read, but they should never earn approval for an invented route.
Walk the physical room once with the approved image on a phone. Stand at the camera position and compare the door width, wall corners, furniture scale, and visible path. This quick field check catches perspective changes that may look reasonable on screen. Photograph any mismatch rather than trying to explain it away later.
Check mirrors and reflective appliances separately. Their reflections can reveal a removed doorway, a duplicated window, or furniture that no longer matches the room. They can also expose the photographer or personal items that genuinely need privacy treatment. Mask only the sensitive reflection; do not replace it with a fictional extension of the room.
Perspective correction deserves the same restraint. Straightening a tilted vertical can make a hand-held photograph easier to read, but aggressive correction stretches objects near the edge. Compare the width of a door or cabinet before and after. If the correction makes one side materially wider, recrop from the original instead.
Finally, inspect the listing sequence, not just one image. A hallway photograph may clarify a doorway that is ambiguous in the bedroom view. Keep complementary angles when they resolve layout. Removing every awkward frame can leave a smooth gallery that hides how the rooms connect, which is exactly the information a visitor needs.
Show A Cleaner Room Without Selling Extra Space
Listing photographs work best when they reduce avoidable distraction and leave permanent constraints visible. Buyers do not need every cable or family frame, but they do need an honest sense of access, scale, and connection between rooms.
Classify the scene, choose the least invasive edit, and compare the fixed lines. That makes a photo edit useful for presentation while the property remains recognizable when someone walks through the actual door.

Passionate about exploring diverse ideas and sharing inspiration, I curate content that sparks curiosity and encourages personal growth. Join me at ElementalNest.com for insights across a wide range of topics.